-
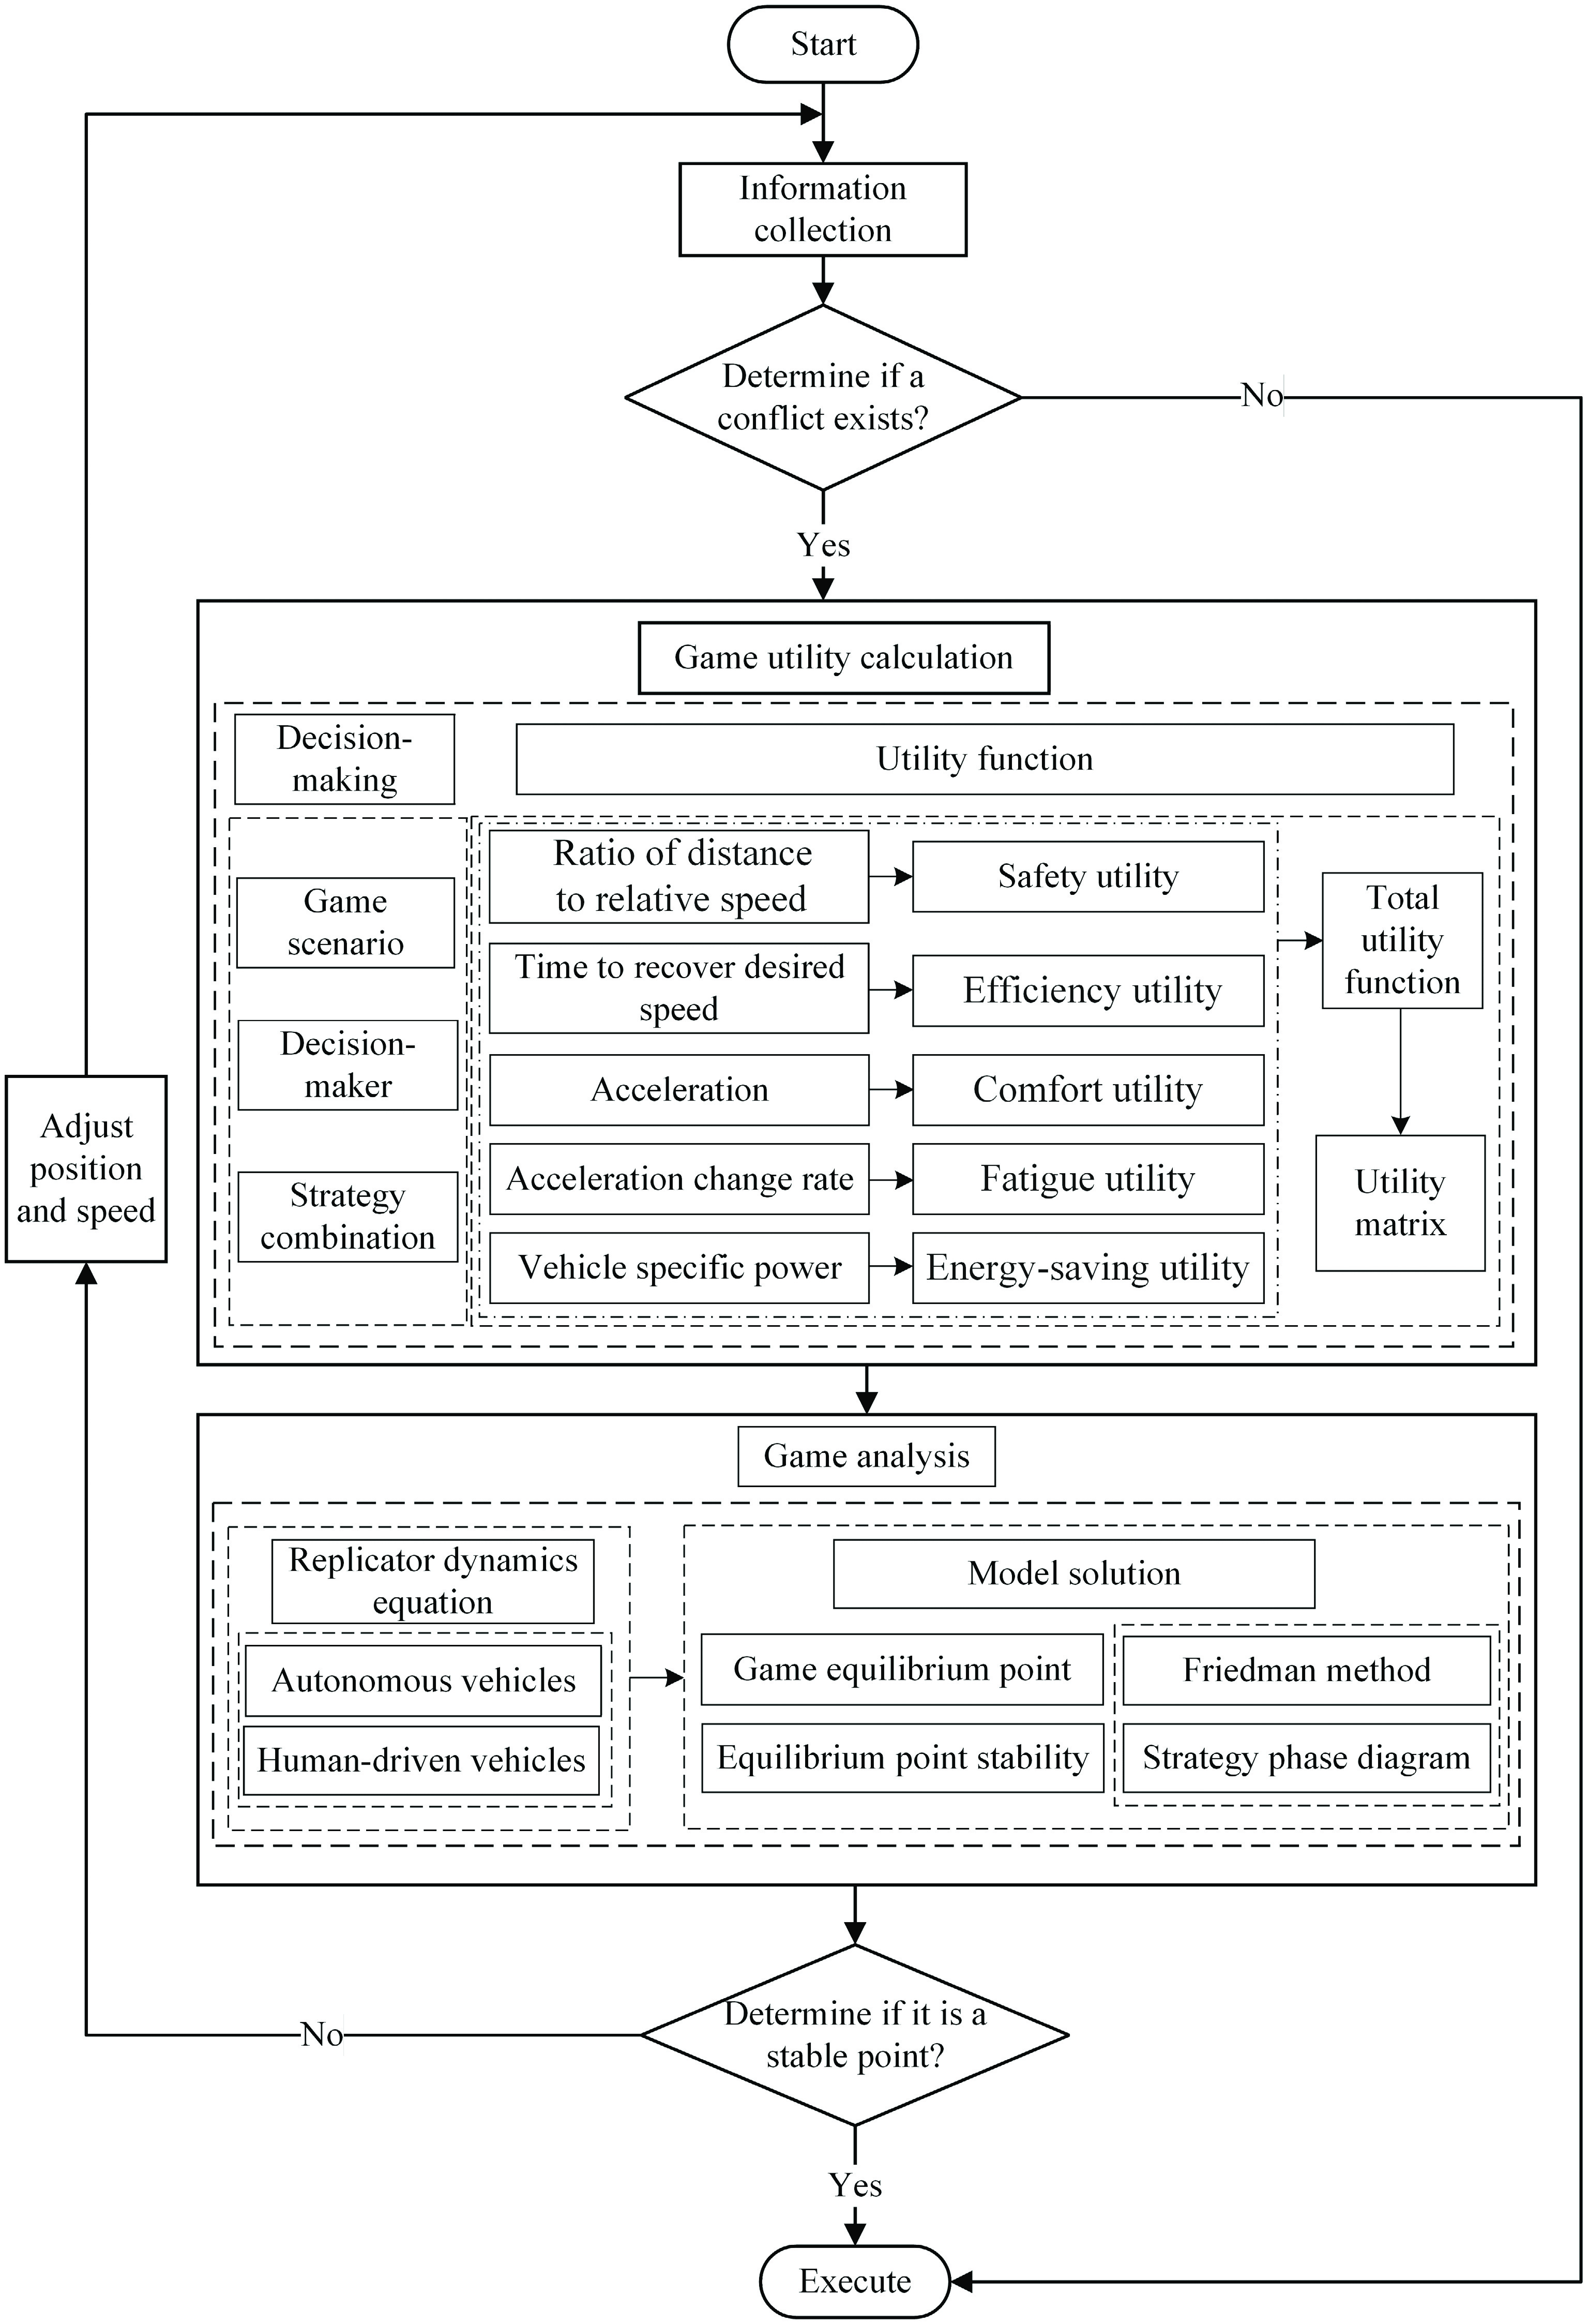
Figure 1.
Flowchart of lane changing decision-making.
-
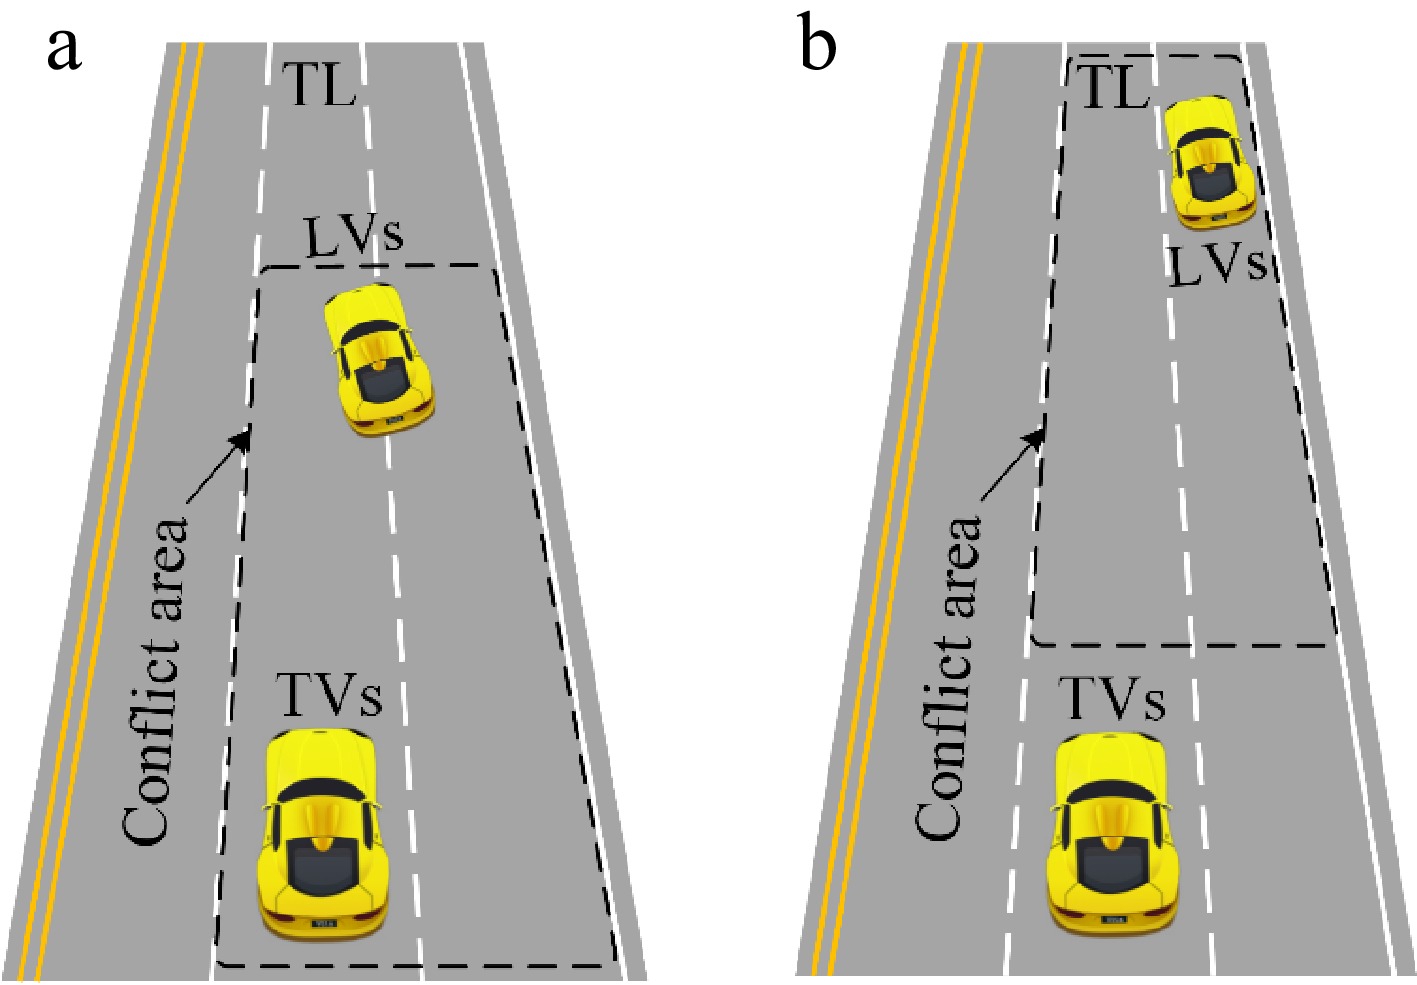
Figure 2.
No-game scenarios between LVs and TVs.
-
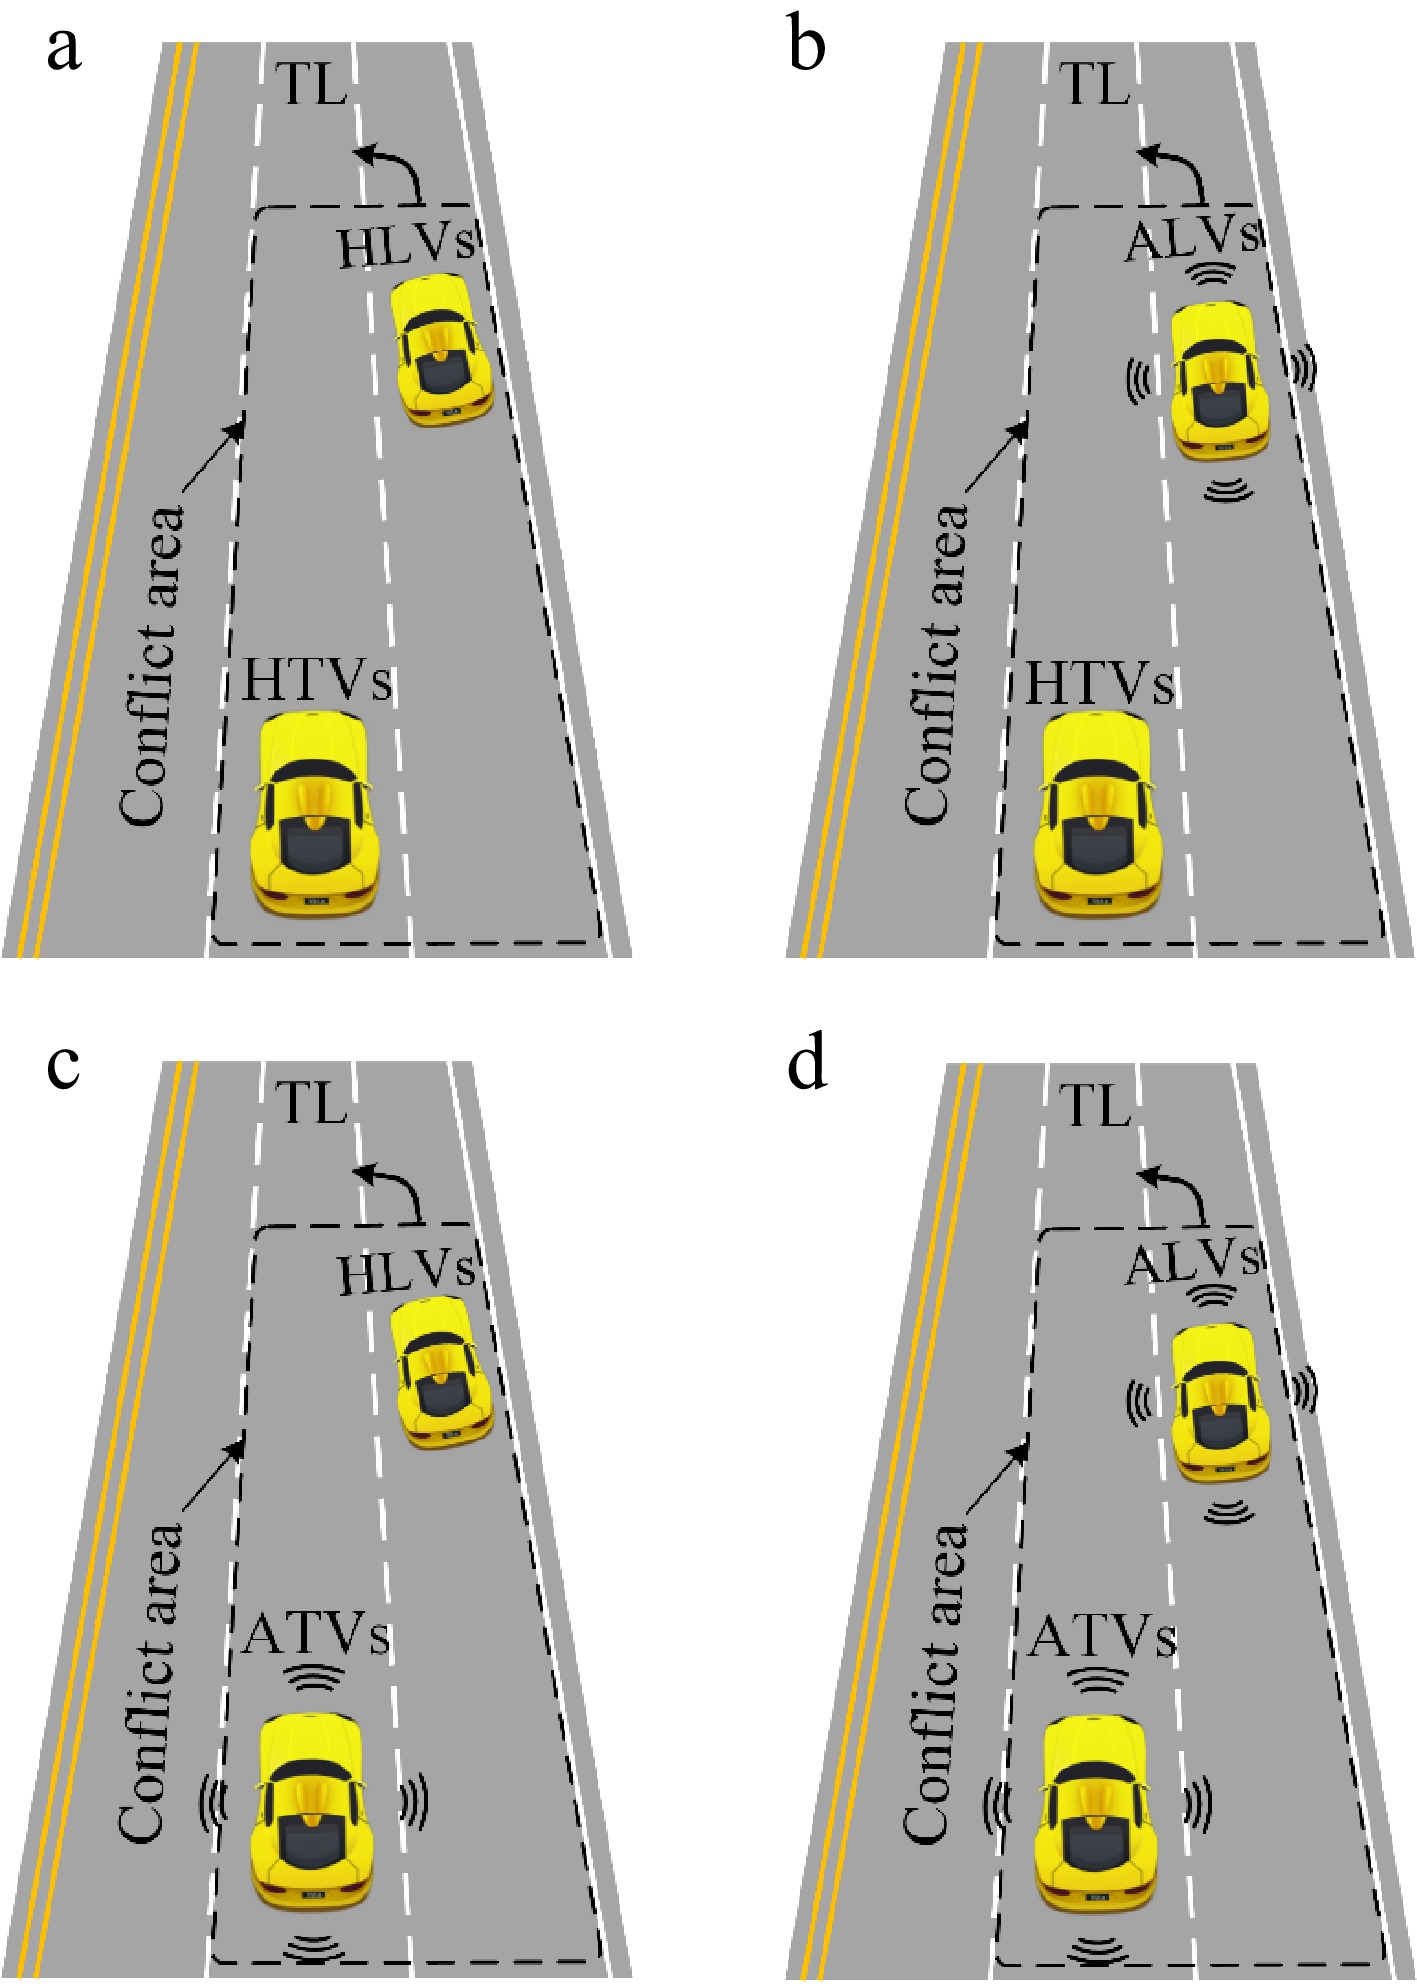
Figure 3.
Game scenarios between LVs and TVs.
-
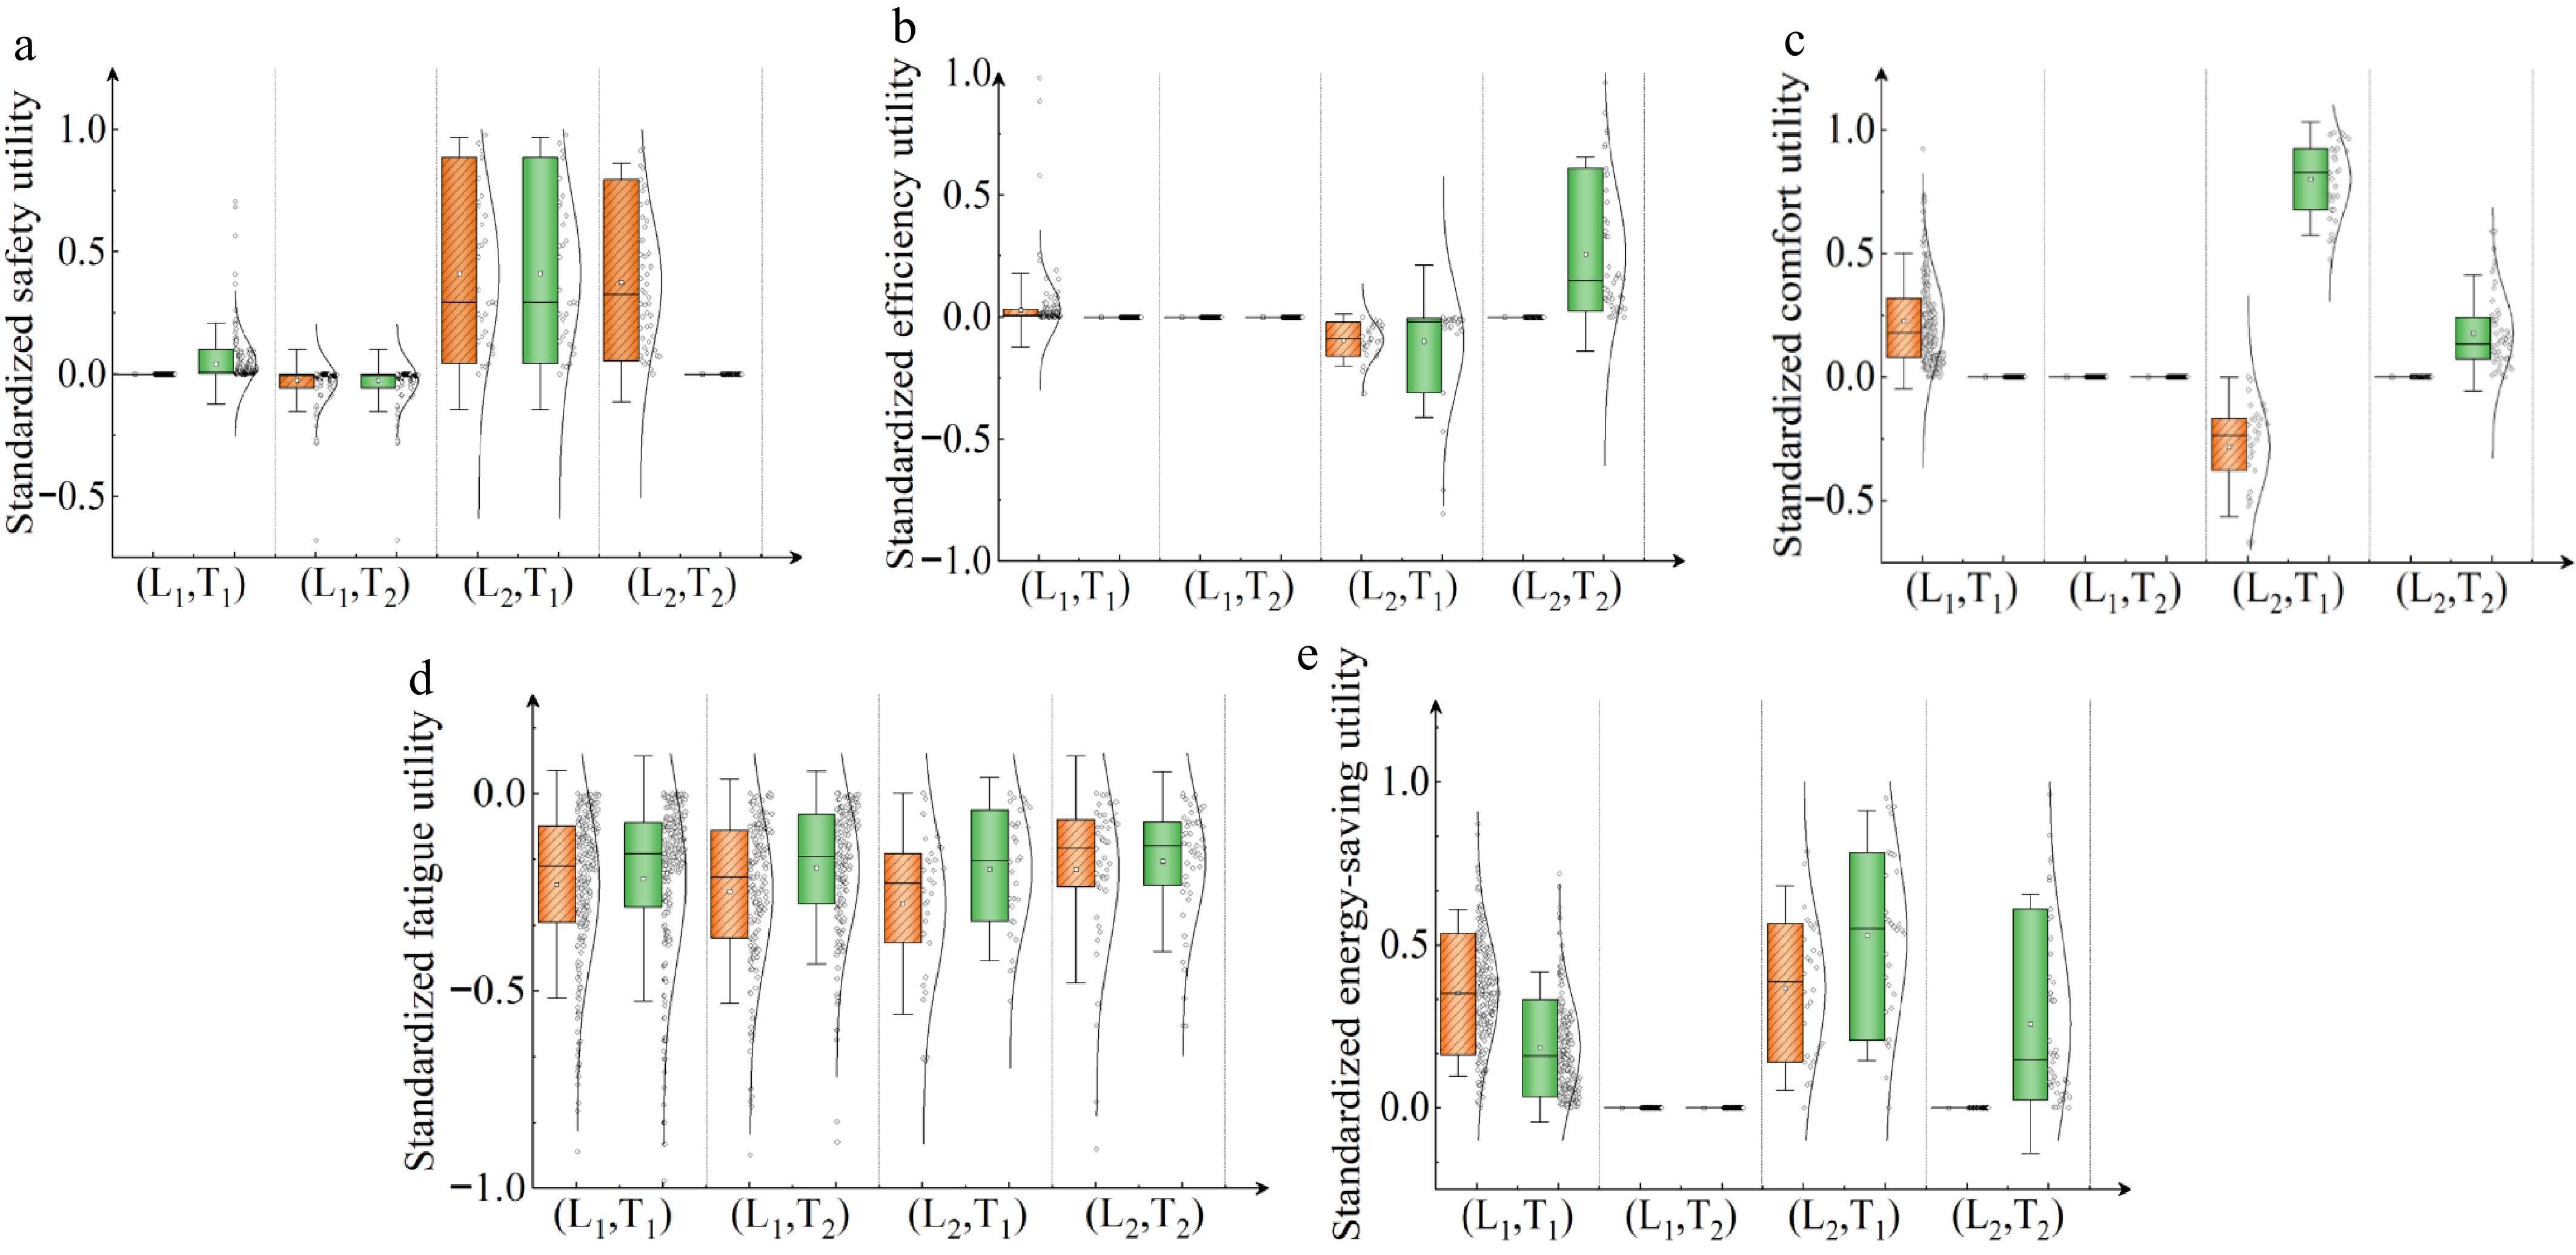
Figure 4.
Standardized safety, efficiency, comfort, fatigue, and energy-saving utilities.
-
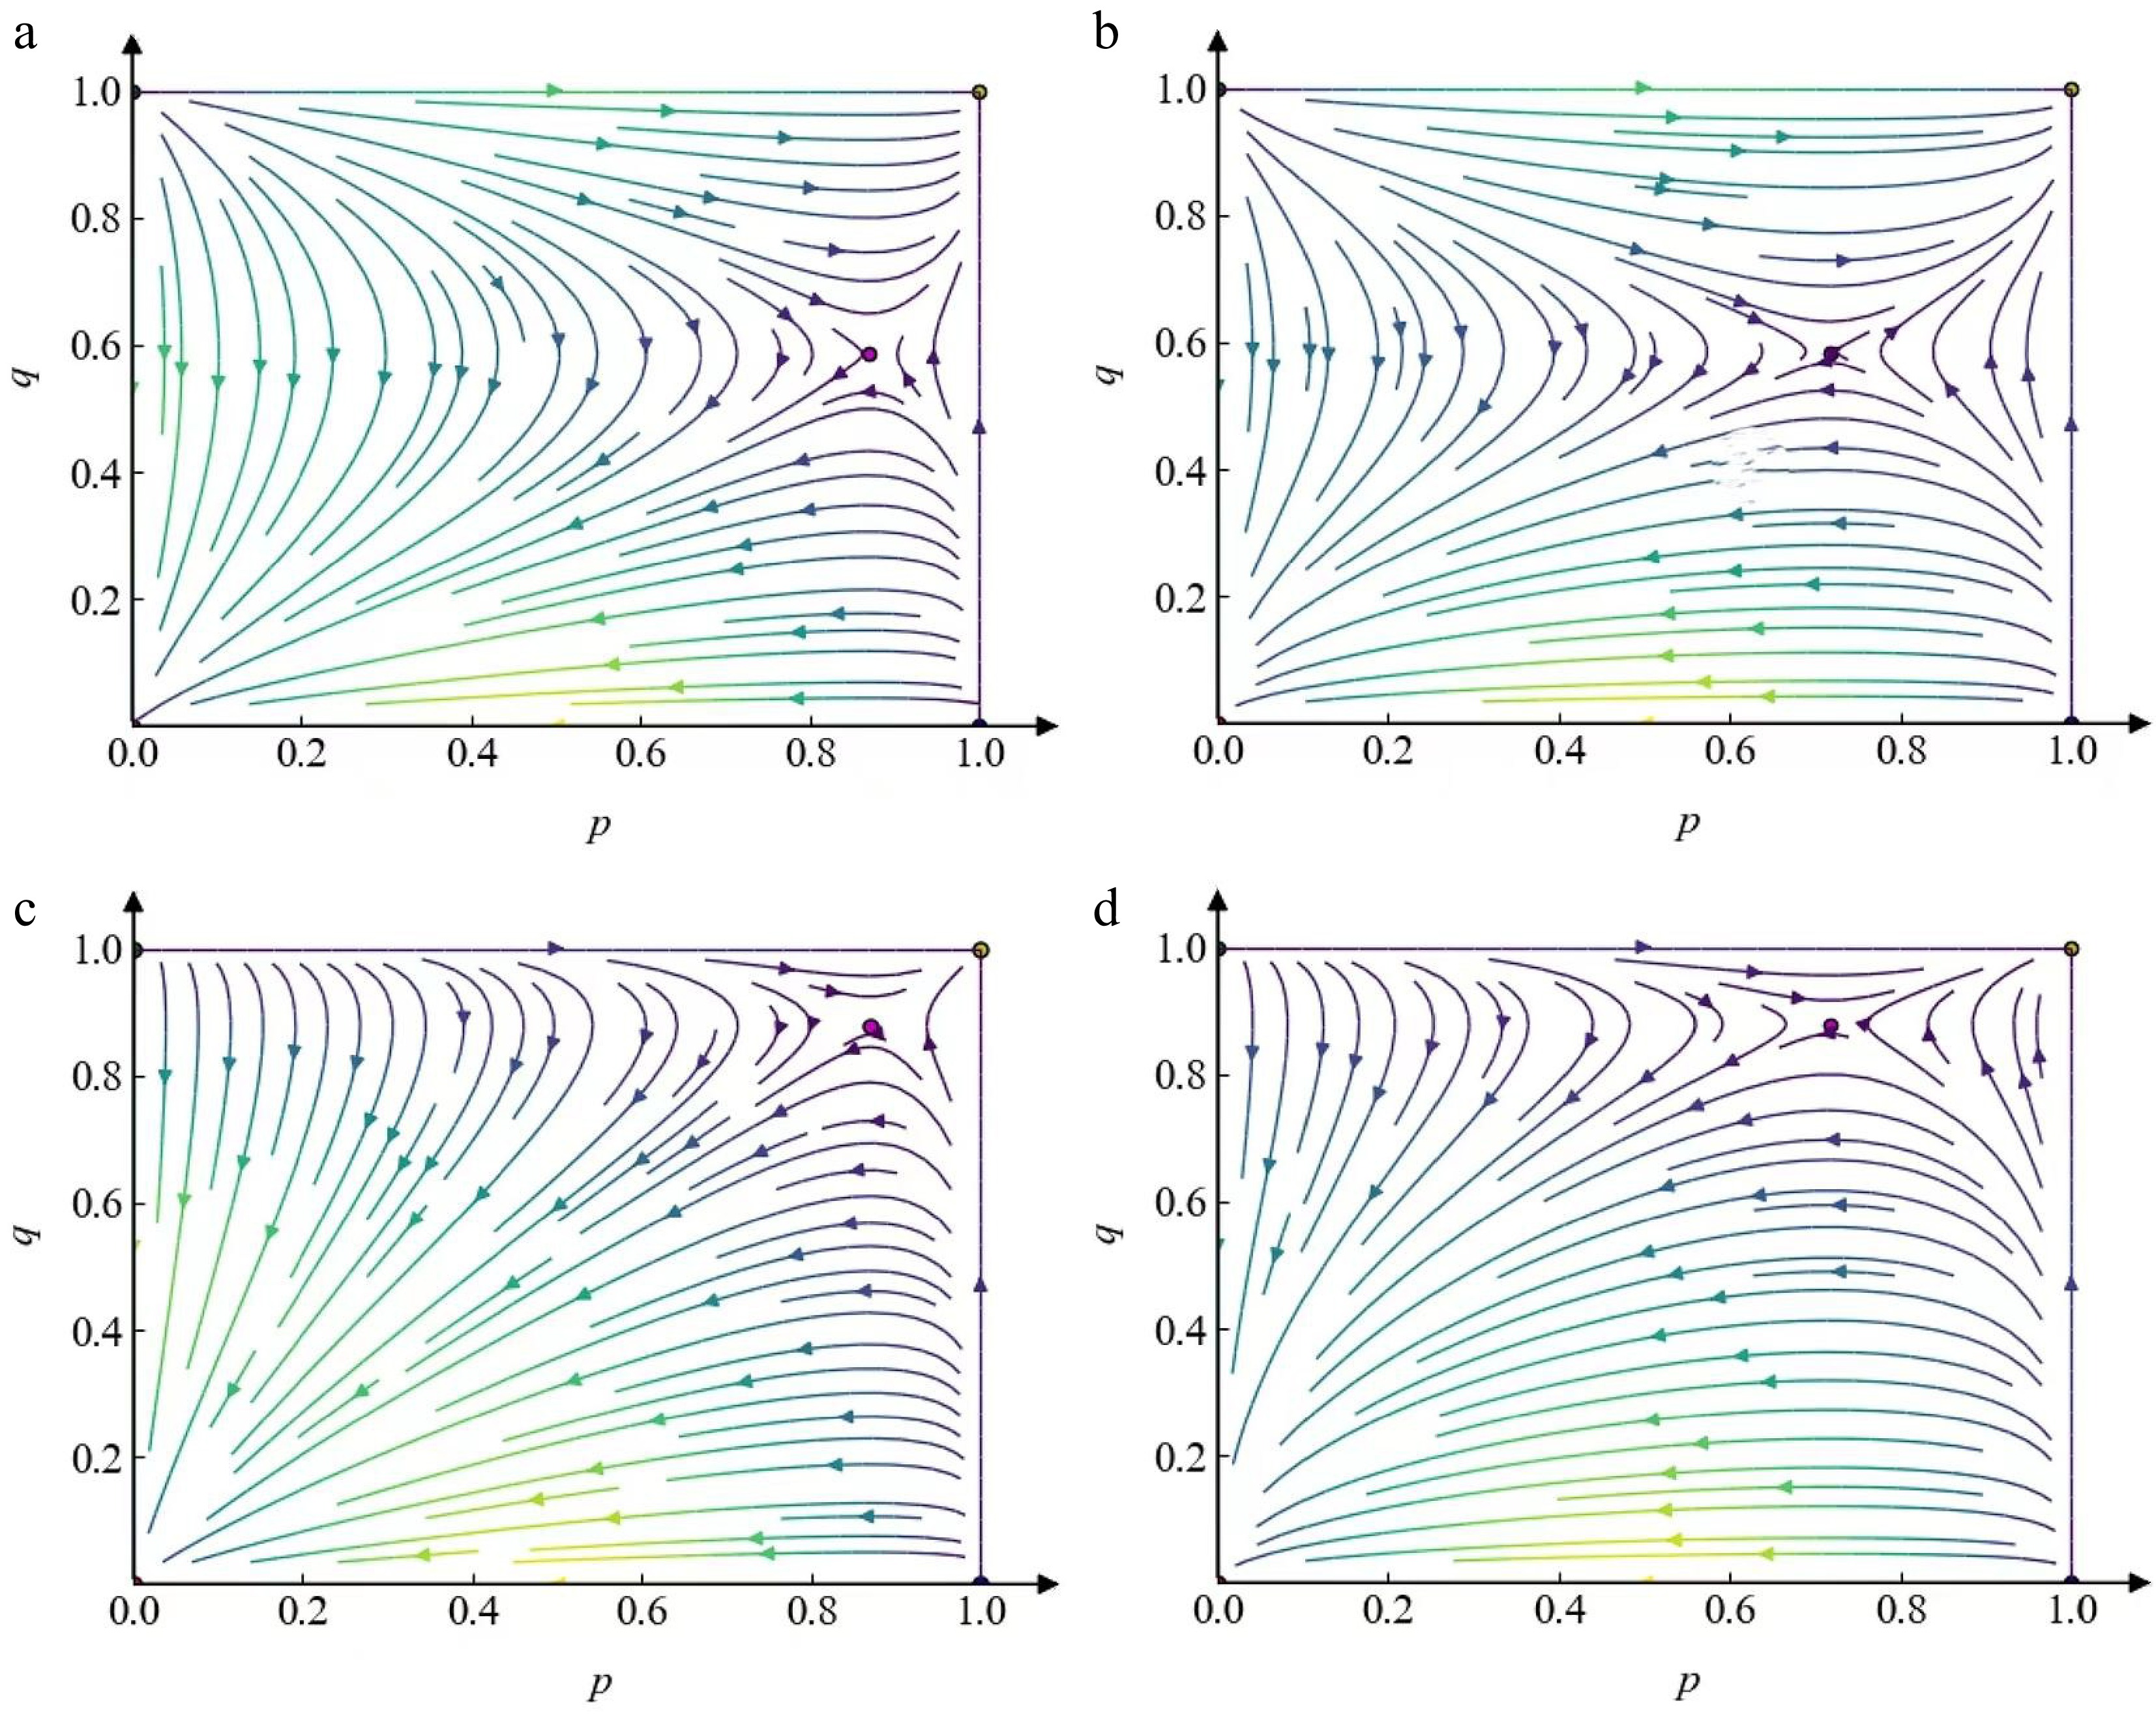
Figure 5.
Evolutionary paths of lane-changing vehicles. (a) HLVs-HTVs game. (b) HLVs-ATVs game. (c) ALVs-HTVs game. (d) ALVs-ATVs game.
-
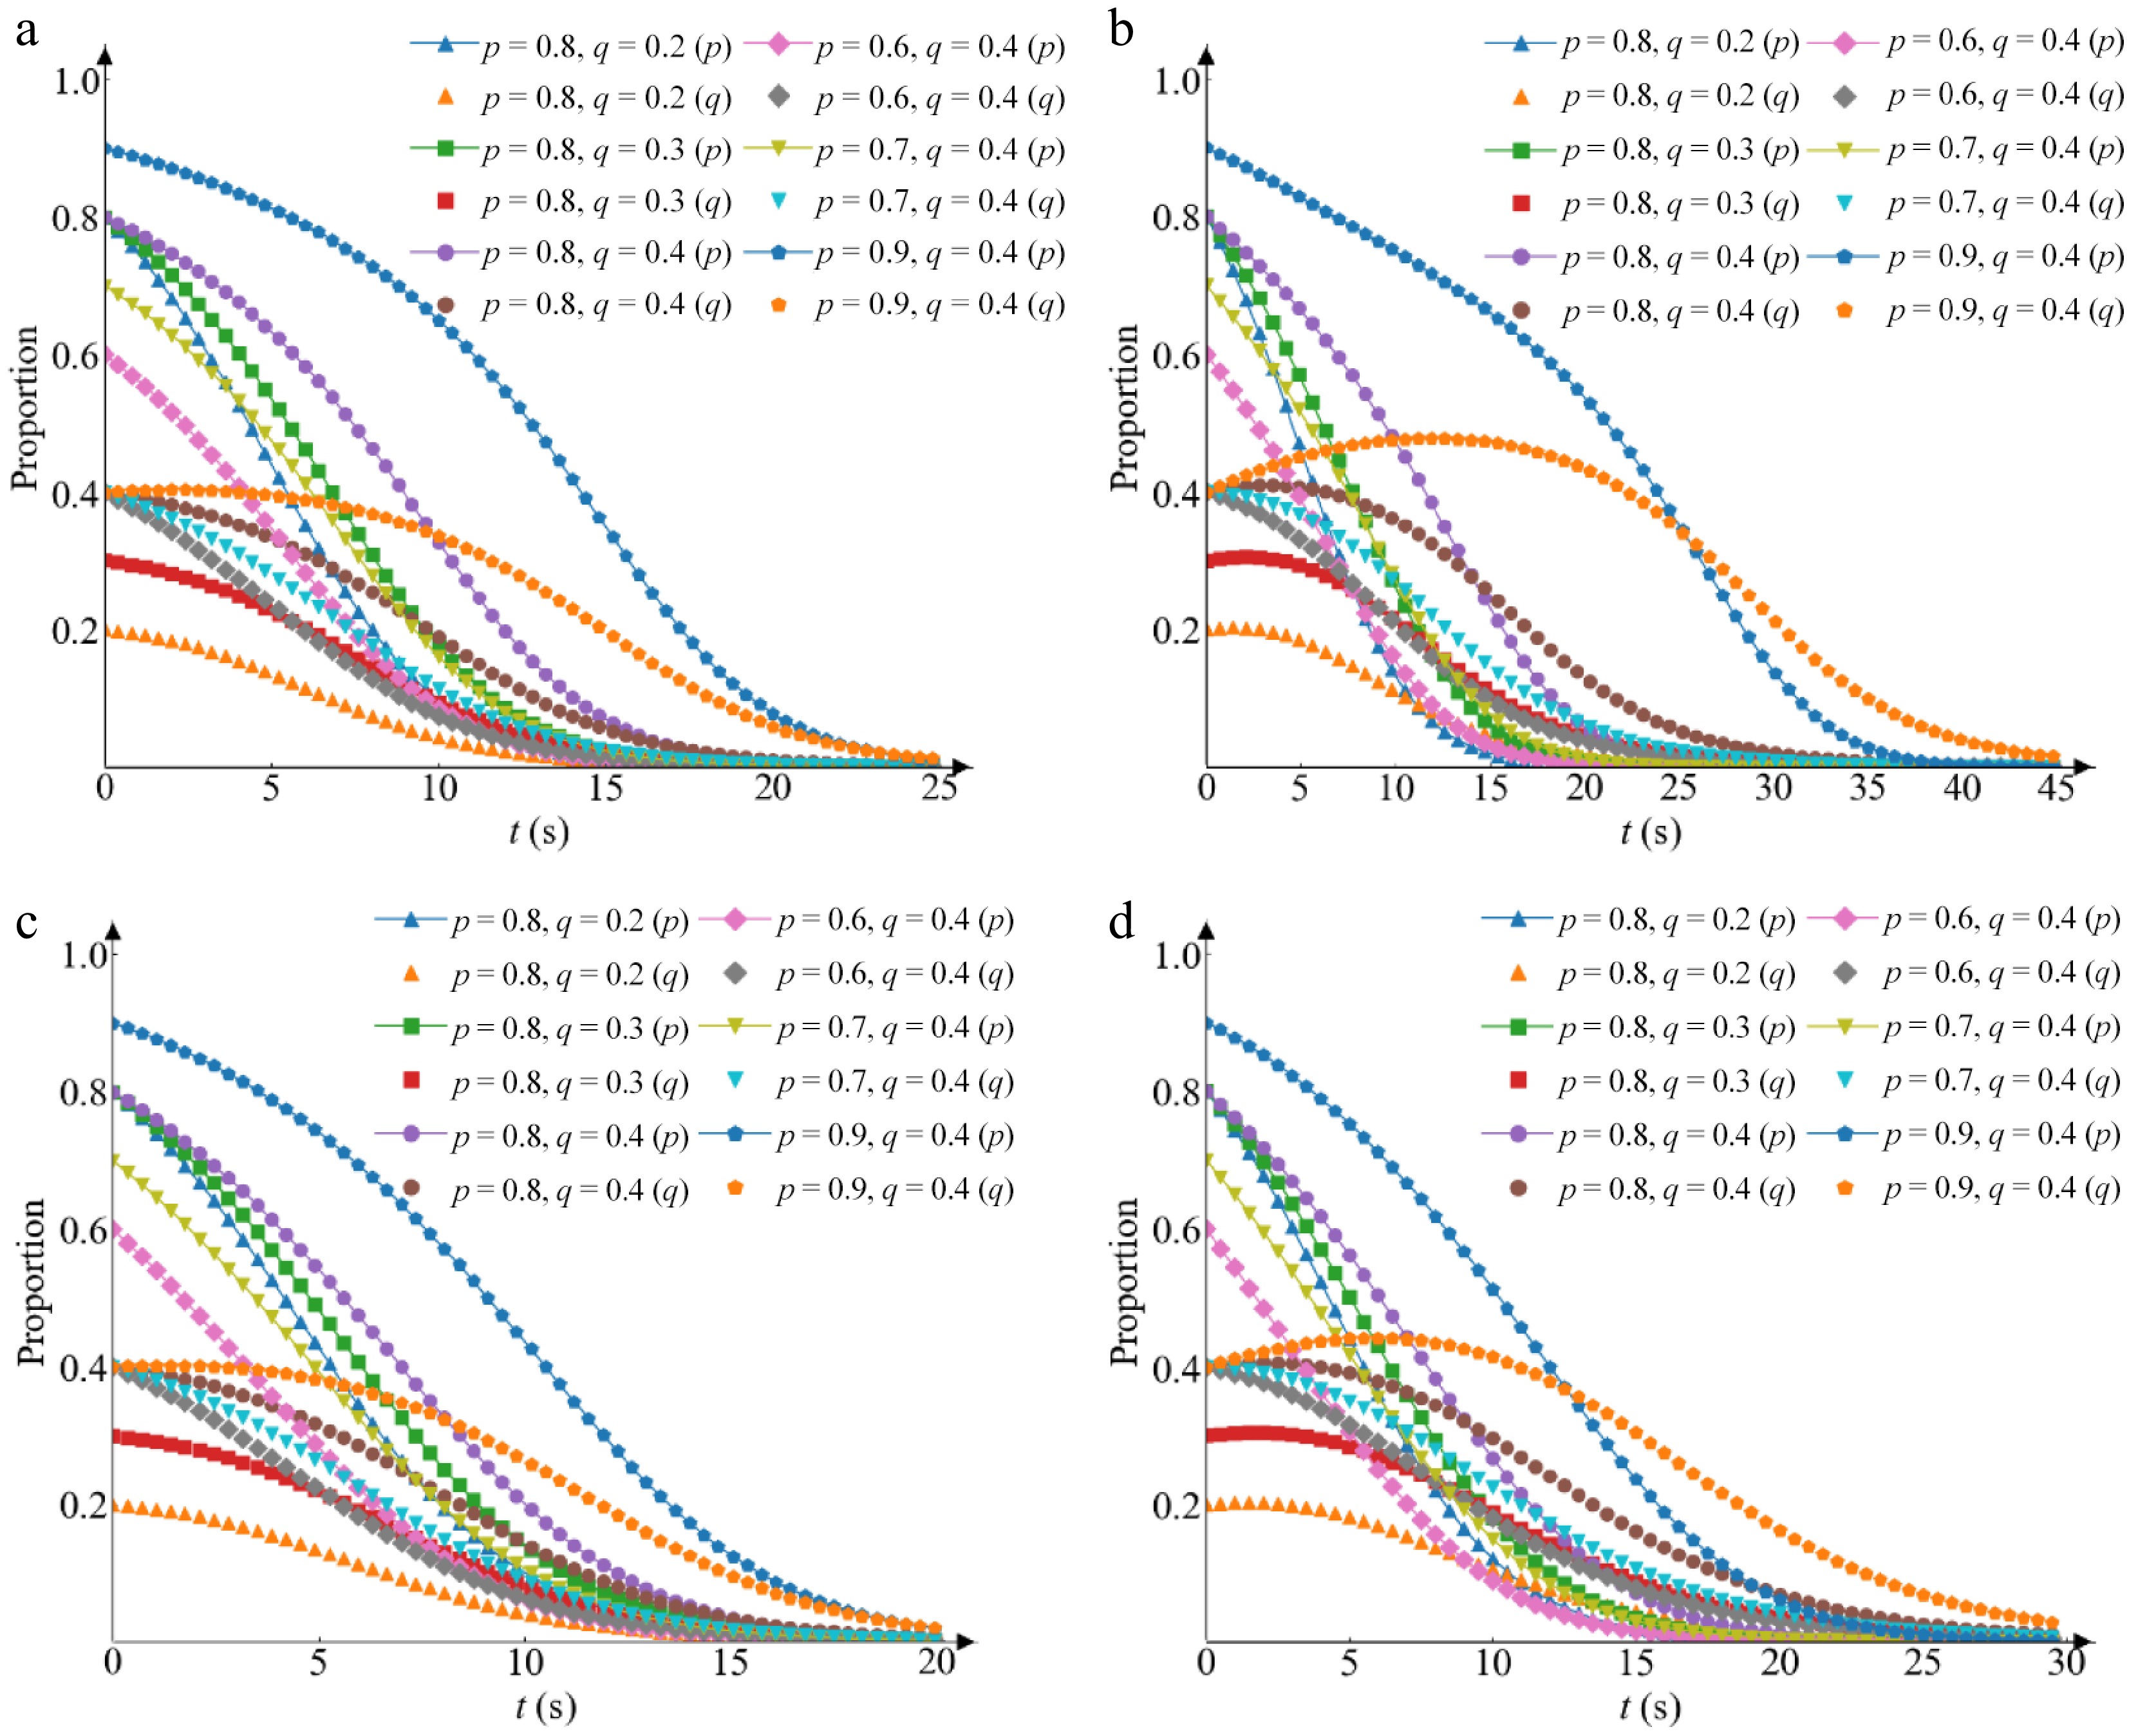
Figure 6.
Evolutionary paths of decision-makers with different p and q. (a) HLVs-HTVs game. (b) HLVs-ATVs game. (c) ALVs-HTVs game. (d) ALVs-ATVs game.
-
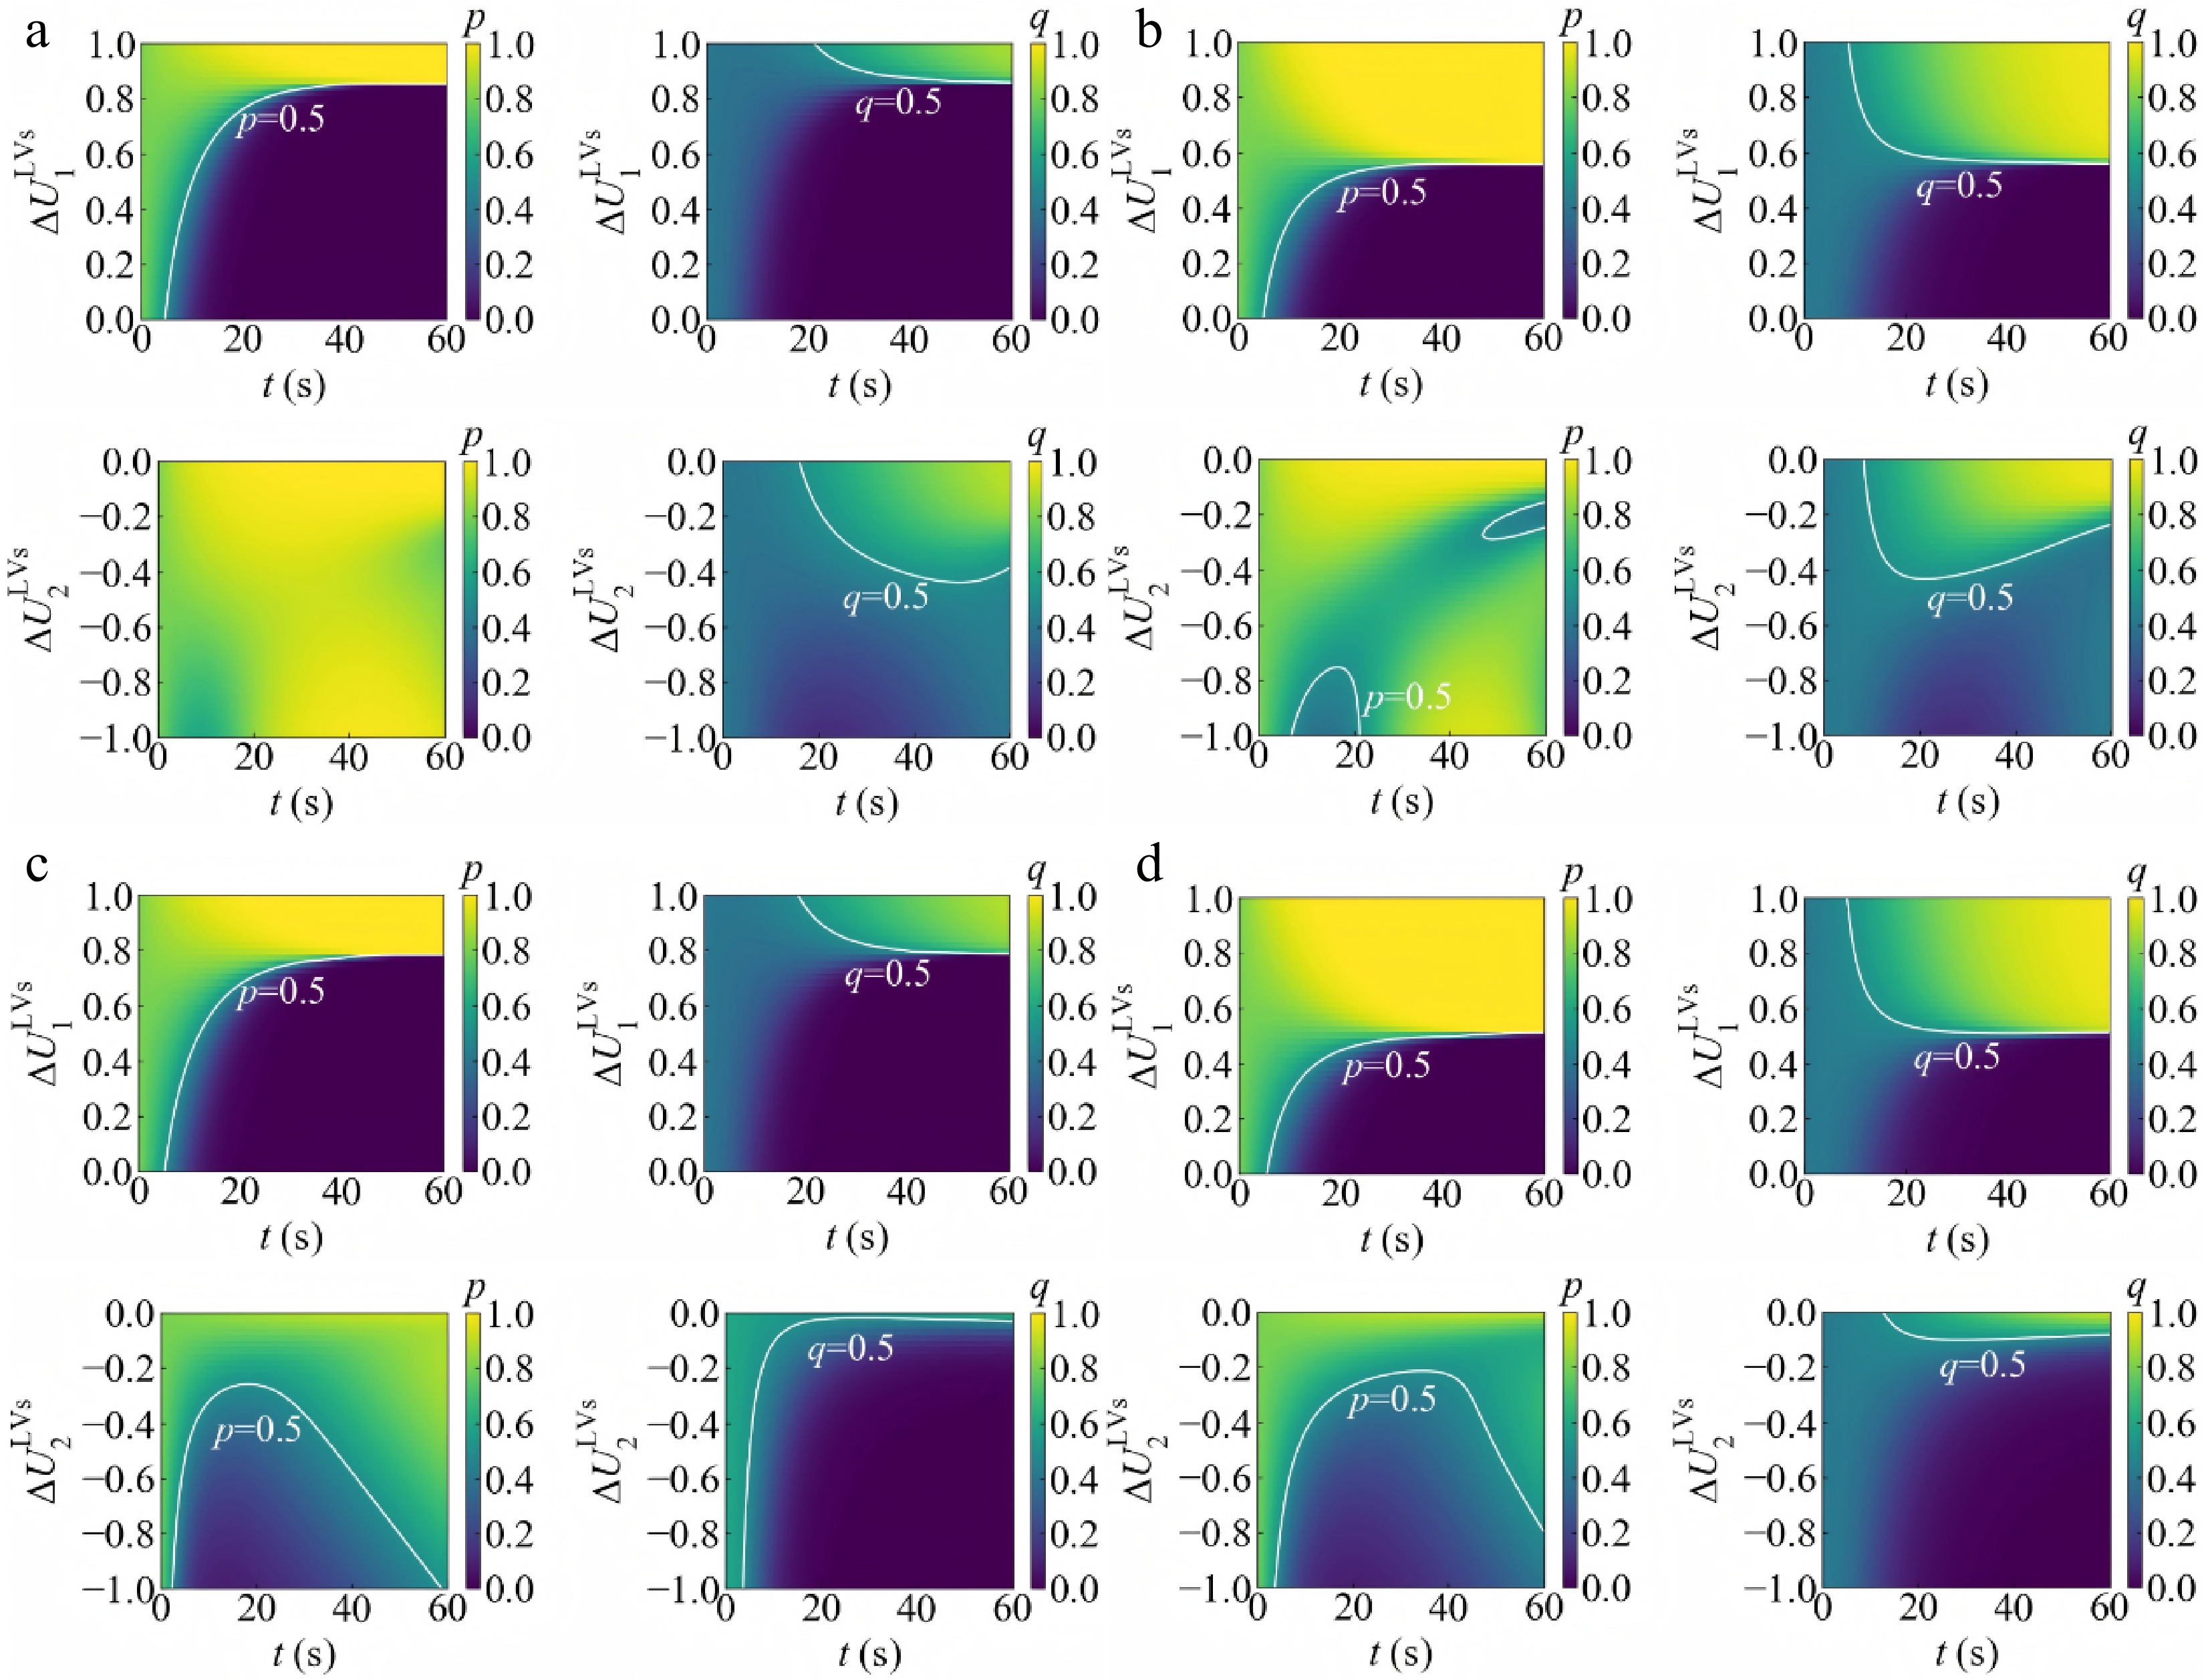
Figure 7.
Evolutionary convergence of the proportion of the strategy under different
$ \Delta U_{i}^{\mathrm{LVs}} $ -

Figure 8.
Evolutionary convergence of the proportion of the strategy under different
$ \Delta U_{j}^{\mathrm{TVs}} $ -
LVs TVs Giving-way Not-giving-way Lane-changing $ (U_{11}^{\mathrm{LVs}},U_{11}^{\mathrm{TVs}}) $ $ (U_{12}^{\mathrm{LVs}},U_{12}^{\mathrm{TVs}}) $ Not-lane-changing $ (U_{21}^{\mathrm{LVs}},U_{21}^{\mathrm{TVs}}) $ $ (U_{22}^{\mathrm{LVs}},U_{22}^{\mathrm{TVs}}) $ Table 1.
Utility matrix of LVs and TVs.
-
Equilibrium points Situation 1 Situation 2 Situation 3 Situation 4 $ \Delta U_{1}^{\mathrm{LVs}} $ $ \Delta U_{2}^{\mathrm{LVs}} $ $ \Delta U_{1}^{\mathrm{LVs}} $ $ \Delta U_{2}^{\mathrm{LVs}} $ $ \Delta U_{1}^{\mathrm{LVs}} $ $ \Delta U_{2}^{\mathrm{LVs}} $ $ \Delta U_{1}^{\mathrm{LVs}} $ $ \Delta U_{2}^{\mathrm{LVs}} $ $ \Delta U_{1}^{\mathrm{TVs}} $ $ \Delta U_{2}^{\mathrm{TVs}} $ $ \Delta U_{1}^{\mathrm{TVs}} $ $ \Delta U_{2}^{\mathrm{TVs}} $ $ \Delta U_{1}^{\mathrm{TVs}} $ $ \Delta U_{2}^{\mathrm{TVs}} $ $ \Delta U_{1}^{\mathrm{TVs}} $ $ \Delta U_{2}^{\mathrm{TVs}} $ (0,0) Saddle point Stable point Saddle point Stable point (0,1) Saddle point Instability point Stable point Saddle point (1,0) Instability point Instability point Instability point Instability point (1,1) Stable point Stable point Saddle point Saddle point (x,y) — Central point — — Equilibrium points Situation 5 Situation 6 Situation 7 Situation 8 $ \Delta U_{1}^{\mathrm{LVs}} $ $ \Delta U_{2}^{\mathrm{LVs}} $ $ \Delta U_{1}^{\mathrm{LVs}} $ $ \Delta U_{2}^{\mathrm{LVs}} $ $ \Delta U_{1}^{\mathrm{LVs}} $ $ \Delta U_{2}^{\mathrm{LVs}} $ $ \Delta U_{1}^{\mathrm{LVs}} $ $ \Delta U_{2}^{\mathrm{LVs}} $ $ \Delta U_{1}^{\mathrm{TVs}} $ $ \Delta U_{2}^{\mathrm{TVs}} $ $ \Delta U_{1}^{\mathrm{TVs}} $ $ \Delta U_{2}^{\mathrm{TVs}} $ $ \Delta U_{1}^{\mathrm{TVs}} $ $ \Delta U_{2}^{\mathrm{TVs}} $ $ \Delta U_{1}^{\mathrm{TVs}} $ $ \Delta U_{2}^{\mathrm{TVs}} $ (0,0) Saddle point Stable point Saddle point Stable point (0,1) Saddle point Instability point Stable point Saddle point (1,0) Saddle point Saddle point Saddle point Saddle point (1,1) Saddle point Saddle point Instability point Instability point (x,y) Saddle point — — — Equilibrium points Situation 9 Situation 10 Situation 11 Situation 12 $ \Delta U_{1}^{\mathrm{LVs}} $ $ \Delta U_{2}^{\mathrm{LVs}} $ $ \Delta U_{1}^{\mathrm{LVs}} $ $ \Delta U_{2}^{\mathrm{LVs}} $ $ \Delta U_{1}^{\mathrm{LVs}} $ $ \Delta U_{2}^{\mathrm{LVs}} $ $ \Delta U_{1}^{\mathrm{LVs}} $ $ \Delta U_{2}^{\mathrm{LVs}} $ $ \Delta U_{1}^{\mathrm{TVs}} $ $ \Delta U_{2}^{\mathrm{TVs}} $ $ \Delta U_{1}^{\mathrm{TVs}} $ $ \Delta U_{2}^{\mathrm{TVs}} $ $ \Delta U_{1}^{\mathrm{TVs}} $ $ \Delta U_{2}^{\mathrm{TVs}} $ $ \Delta U_{1}^{\mathrm{TVs}} $ $ \Delta U_{2}^{\mathrm{TVs}} $ (0,0) Instability point Saddle point Instability point Saddle point (0,1) Saddle point Instability point Stable point Saddle point (1,0) Saddle point Saddle point Saddle point Saddle point (1,1) Stable point Stable point Saddle point Saddle point (x,y) — — — Saddle point Equilibrium points Situation 13 Situation 14 Situation 15 Situation 16 $ \Delta U_{1}^{\mathrm{LVs}} $ $ \Delta U_{2}^{\mathrm{LVs}} $ $ \Delta U_{1}^{\mathrm{LVs}} $ $ \Delta U_{2}^{\mathrm{LVs}} $ $ \Delta U_{1}^{\mathrm{LVs}} $ $ \Delta U_{2}^{\mathrm{LVs}} $ $ \Delta U_{1}^{\mathrm{LVs}} $ $ \Delta U_{2}^{\mathrm{LVs}} $ $ \Delta U_{1}^{\mathrm{TVs}} $ $ \Delta U_{2}^{\mathrm{TVs}} $ $ \Delta U_{1}^{\mathrm{TVs}} $ $ \Delta U_{2}^{\mathrm{TVs}} $ $ \Delta U_{1}^{\mathrm{TVs}} $ $ \Delta U_{2}^{\mathrm{TVs}} $ $ \Delta U_{1}^{\mathrm{TVs}} $ $ \Delta U_{2}^{\mathrm{TVs}} $ (0,0) Instability point Saddle point Instability point Saddle point (0,1) Saddle point Instability point Stable point Saddle point (1,0) Stable point Stable point Stable point Stable point (1,1) Saddle point Saddle point Instability point Instability point (x,y) — — Central point — Table 2.
Stability analyses of equilibrium points of evolutionary game.
Figures
(8)
Tables
(2)